(like the original)
Part 2: Car Decoder
Part 3: Lane Brain
Part 4: Dongle
Teil 2: Auto Dekoder
Teil 3: Weichen Logik
Teil 4: USB WLAN
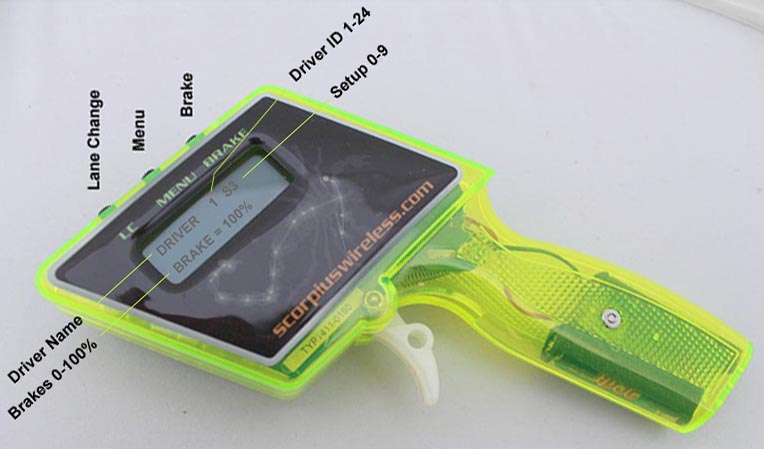
The homepage shows:
Driver name
Driver ID 1-24
Sensitivity setting 0-9
Brake setting 0-100%
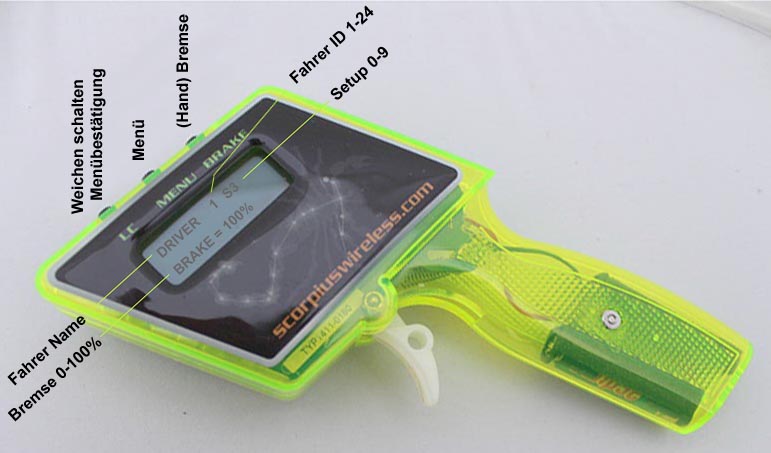
Der Startbildschirm zeigt:
Name des Fahrer
Fahrer - ID
SetUp # 0-9
Bremseneinstellung 0-100%
1)ID Configuration
To change controller
ID number:
i) Press Menu button for 2 seconds
ii) Use menu knob to scroll to ID page
iii) Press LC button once, this takes you to “Edit
ID”
iv) Use menu knob to scroll to desired ID number
v) Press LC button to exit edit mode
vi) Press menu button to escape
The controller ID is now set.
i)
Drücke die Menü-Taste 2 Sekunden
ii) Wähle mit dem Menüknopf die [Menu / ID=#]
an
iii) Drücke die LC-Taste einmal um den Edit-Modus
[Edit / ID=#] zu aktivieren
iv) Wähle mit dem Menü-Knopf die gewünschten
ID-Nummer
v) Drücke die LC-Taste, um die eingestellte ID-Nr
zu bestätigen und den Editmodus zu verlassen
vi) die Menü-Taste drücken, um das Menü
zu verlassen
Die Controller-ID ist
nun eingestellt.
Menu screens:
1) Reflash
from PC
Displays as follows:
Reflashing updates the controller with the latest software.
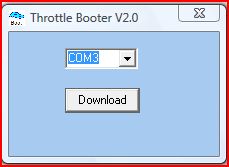
To reflash controller:i) Click on Scorpius Throttle Booter program on PC.
ii) Press Menu button for 2 seconds to activate menu on controller.
iii) Use Menu knob to scroll to Reflash from PC
Menu
[ ReFlash from PC ]
iv) On PC press Download to prompt
The controller screen will show like this:
Menu
[ Reflashing
On PC download progress bar should start filling from 0 to 100%
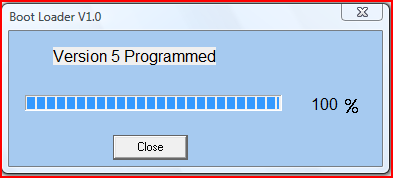
vi) Press Close once the progress bar is full.
After 5 seconds controller screen will return to the home page.
vi) Close Scorpius Throttle Booter program
Your controller has now been reflashed (upgraded) wirelessly.
Menü-Bildschirme:
1) Programmierung
vom PC
zeigt folgendes Display:
Reflashing aktualisiert den Regler mit der neuesten Betriebssoftware.
Um den Regler neu
zu programmieren:
i) Klicke auf Scorpius Throttle Booter-Programm auf dem
PC
ii) Drücke Menü-Taste für 2 Sekunden,
um am Regler das Menü zu aktivieren.
iii) Wähle mit dem Menüknopf [Menu / ReFlash
from PC]
iv) drücke am PC [Download]
v) drücke am Regler die LC-Taste um den download
zu starten
Das Reglermenü zeigt [Menu / Reflashing]
Am PC zeigt der Downloadbalken
den Fortschritt an
vi) nach 100% kann mit klick auf close das Programm beendet
werden.
Nach 5 Sekunden zeigt der Regler wieder das Betriebsfenster an
Der Regler ist nun mit dem Firmwareupgrade ausgestattet.
2) Configure
from PC
Displays as
follows:
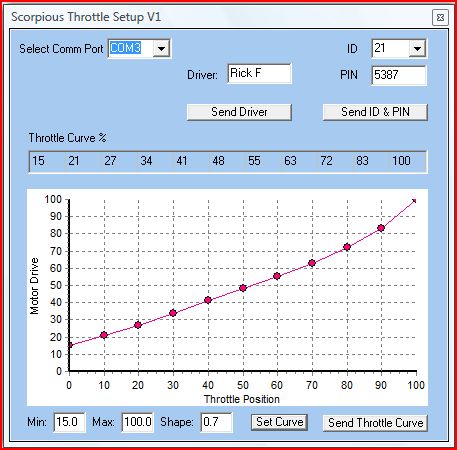
3 functions on your controller you can reconfigure from your PC
i) Reconfiguring Driver
ii) Reconfiguring ID and/or PIN.
iii) Reconfiguring Throttle Curve
Click on
Send ID & PIN
or
Send Throttle Curve
or
Send Driver
depending on the requirement.
Press Menu button on controller for 2 seconds.
Use Menu knob to select
Menu
[ Config from PC ]
Press LC button.
“Configuring…” will come up on controller screen.
Press OK on Scorpius Throttle Setup prompt box.
Controller
screen returns to default setting.
i) Driver have now been reconfigured
ii) Controller ID and PIN have now been reconfigured
iii) Throttle Curve have now been reconfigured.
Menu
[ Version = 5 ]
Shows the software
version number for reference.
4) Driver name
To reconfigure from controller:
Press Menu button for 2 seconds to activate menu on controller.
Use Menu knob to scroll to Driver Name page.
Menu
[ DRIVER Rick F ]
Press LC button, use brake
knob to scroll to letter. Press LC to lock it in.
Press LC button again to progress to the next letter.
Press LC button, use brake knob to scroll to letter. Press LC to lock
it in.
Repeat for all letters.
Press brake menu twice to escape.
5) PIN
To reconfigure from controller:
Press Menu button for 2 seconds to activate menu on controller.
Use menu knob to scroll to PIN page.
Menu
[ PIN = 1234 ]
Press LC button, use menu knob
to scroll to desired numbers. Press LC to lock it in.
Press LC button again to progress to the next number.
Press LC button, use menu knob to scroll to desired numbers. Press LC
to lock it in.
Press menu button twice to escape.
6) Throttle power curve edit
To reconfigure from controller:
Press menu button for 2 seconds to activate menu on controller.
Use menu knob to scroll to “Edit Curve” page.
Menu
[ Edit Curve ]
Press LC button, use menu knob to scroll to desired point. There are 10 bands horizontally to choose from. Press LC to lock the band, use the menu knob to select value between 0-100.
Menu
[ Edit Curve ]
[ Point 5 = 50% ]
Use LC button to lock value in. Use menu knob to select another point (band) and repeat for all bands.
Press menu button twice to escape.
7) Learner mode setting
To reconfigure from controller:
Press Menu button for 2 seconds to activate menu on controller.
Use menu knob to scroll to “Learn”
Menu
[ Learn Max = 70% ]
Press LC button. Use menu knob
to dial value 0-100. 100 is 100% power, 50 is 50% of full power etc.
Press menu button twice to escape.
8) Learner mode on/off
Use brake knob to scroll to “Learn Mode On/Off”
Menu
[ Learner Mode Off ]
Press LC button to select either
on or off.
Press menu button once to escape.
To
transfer throttle ID and PIN to car from controller:
Press Menu button for 2 seconds to activate menu on controller.
Use Menu knob to scroll to “Set Car ID and PIN”
Menu
[ Set Car ID & PIN ]
Press LC button. Controller prompt on screen reads :
Menu
[ Remove CAR & ]
[ Replace on Track ]
Press LC button to
return to menu.
Press Menu button to escape.
The car now has the same ID and PIN as the controller and are a matching
pair.
Ensure no other cars are stationary on the track or they will receive
the same settings.
10) Controller ID
To change ID of the controller:
Press Menu button for 2 seconds to activate menu on controller.
Use Menu knob to scroll to ID page.
Menu
[ ID = 9 ]
Press LC button
Use menu knob to choose desired ID
Menu
[ ID = 10 ]
Press brake button to escape.
Press LC button to lock it in.
Press Menu button once to escape.
11)Sensitivity
Simply use Sensitivity knob
to scroll from 0-9 (10 preset curves)
Reflashing Car decoder
Select Scorpius Booter program.
Press “download” button.
Lift car from rails for 5 seconds and replace.
The Scorpius car decoder now has the latest firmware.
Changing Car ID
See under Controller section,
part 9:
To transfer throttle ID and PIN to car from controller:
Press Menu button for 2 seconds to activate menu on controller.
Use Menu knob to scroll to [ Set Car ID and PIN ]
Reflashing Lane Brain
Select Lane Brain Booter program.
Press “download” button.
Press the reset button on the Lane Brain.
Press OK on booter window or cancel to quit.
Flippers will now operate every 5 seconds, this confirms the Lane Brain
has been reflashed.
Switch off system for 5 seconds, turn system back on.
Lane Brain now has latest firmware and is ready to use.
Reconfiguring Lane Brain
Select Lane Brain Set Up program
on the PC.
Reconfigure the LB by adjusting parameters and boxes.
Press “Download”.
Press the reset button on the Lane Brain.
Press “OK” on Set Up program.
Flippers will now operate every 5 seconds, this confirms the Lane Brain
has been reconfigured.
Switch off system for 5 seconds, turn system back on.
Lane Brain is now reconfigured and ready to use.
Changing parameters on the Lane Brain Set Up program
Setting parameters before sending
to Lane Brain:
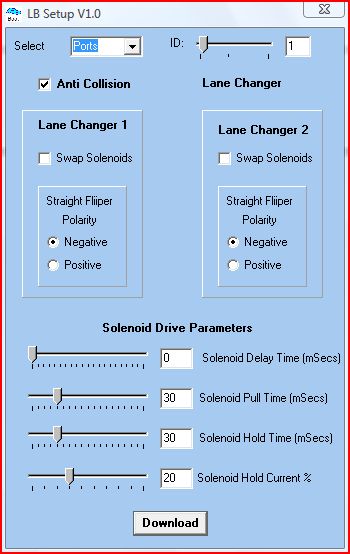
Com Port select
Reconfigure communication port.
Press “Download” and follow the prompts.
Set Lane Brain ID
Set Lane Brain ID number from
0 to 24
Use slider to set ID
Set Lane Brain to ID 0 for lapcounting.
Set each Lane Changer and set the corresponding Lane Brain to the same
ID.
Set Lane Brain IDs in numerical sequence starting at number 1 being the
first LC after the start, 2 being the second LC, etc
Press “Download” and follow the prompts.
Anti Collision
Tick box to enable Anti Collision
Untick to disable.
Press “Download” and follow the prompts.
Spring Flipper
Tick this box if you are using
Carrera, Ninco or any custom made flipper assembly where one solenoid
is used in conjunction with spring or mechanical return mechanism.
Swap Solenoids
Incorrectly wired solenoids,
example gate shuts when it should open and vice versa, can be reversed
by ticking the box and reconfiguring.
Press “Download” and follow the prompt.
Swap Polarity
Swap polarity of live flipper
if required
Press “Download” and follow the prompts.
Change solenoid drive parameters
Adjust the following:
Solenoid delay time
Used in situation where flipper opens and closes before car arrives at
flipper. Increase value in 10 mSec increments until suitable.
Solenoid pull time
The pull time is the time that power is applied to the solenoid.
Sending new parameters to LB
Once you have chosen your new
parameters press “Download” on the LB Set UP program.
Press reset button on LB.
Press OK on LB Set Up program
Flippers will operate every 5 seconds.
Turn system off for 5 seconds.
Turn system back on.
Lane Brain is now reconfigured.
Plug dongle into USB port.
Dongle is now ready to use.